GALEN LEATHER BICYCLE BAGS: Gear Review

Galen Leather Bicycle Bag

GALLEN LEATHER ‘CROSS BAR BAG’ AND ‘LARGE SADDLE BAG’

Galen Leather Bicycle Bags on my sexy Brodie Bike

SPECS:

(Cross bar bag)

Top 9.84” (25cm) Bottom 7.87” (20cm) Height 4.7” (12cm)

(Large saddlebag)

4” x 8” (10cm x 20cm)

Distance between straps 3.54” (9cm)

GALEN LEATHER BICYCLE BAGPROS:

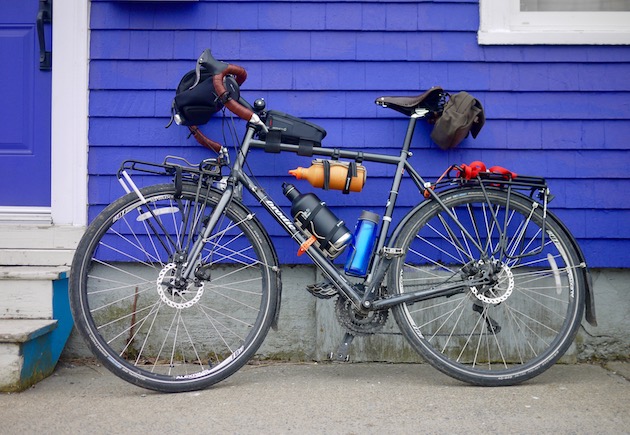
  • Stylish on a city bike or classic touring bike
  • Leather is extremely durable and long lasting
  • Looks great if you have a brooks saddle!
  • Very high quality stitching
  • Simple opening / closure and easy to attach and take off
  • Thick strong material protects contents of bags
  • Can be wiped clean and won’t stain
  • Large enough to fit tools, tubes, plus most importantly…snacks!
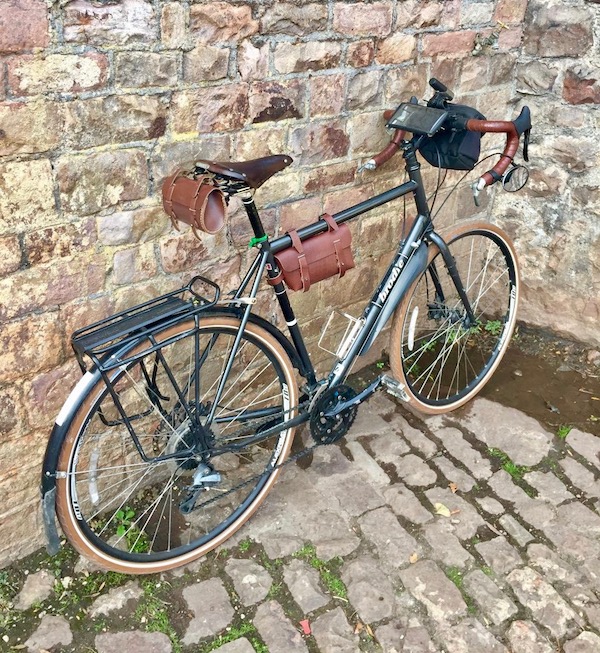
  • The saddle bag can also be used as a handle bar bag if preferred and depending on your bikes frame size the cross bar bag could be mounted towards front of bike or as pictured near the seat tube

CONS:

  • Much like Brooks leather saddles probably shouldn’t be left in the rain too long
  • Stylish to the point that they might actually be a target for thieves in a city
  • Possibility that they could swing when loaded with heavy items
  • Maybe not my first choice for a long term round the world type tour, but would be great on multi day trips or commuting

Galen Leather Bicycle Bags on my sexy Brodie BikeOVERVIEW:

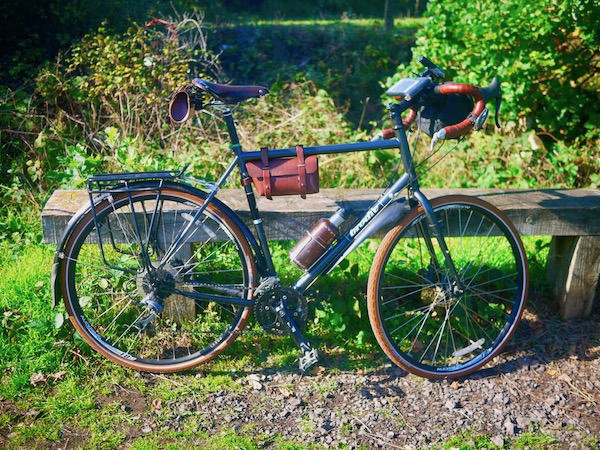
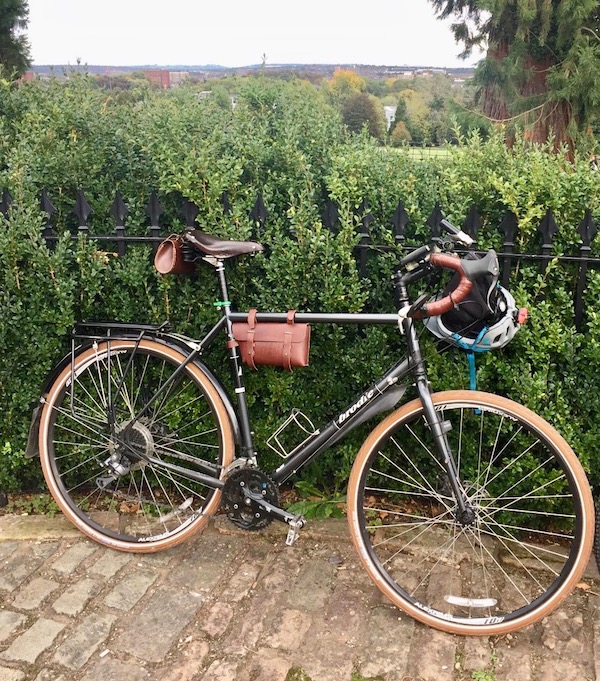
I was asked to review the Galen Leather ‘Cross Bar Bag’ and ‘Large saddle bag’ and have spent several weeks putting it to the test commuting and doing some long rides in and around the lovely city of Bristol in England.

I was very keen for these bags to arrive as I had just swapped out my Schwalbe marathon tyres after 1500km + for some new funky looking Brown Schwalbe delta cruisers and thought the colours would match and look pretty sweet especially with my brooks saddle. Yes I am a bit of a sad case and like colour coordinating my bike!

Galen Leather Bicycle Bags on my sexy Brodie Bike

The Gallen Leather Bicycle Bags are hand stitched in Turkey, which is also a bonus to me being one of my favourite countries and a definite contender for my favourite country to cycle tour in!

I was not disappointed; the bags look fantastic and completely gave my bike a cool makeover, plus the quality is superb and adds some easy to access storage space for trips around the city.

DESIGN AND FUNCTIONALITY:

Both bags have been designed very well with the straps being long enough to wrap around a variety of tube sizes without being too long that they get in the way or rub against your legs when pedaling.

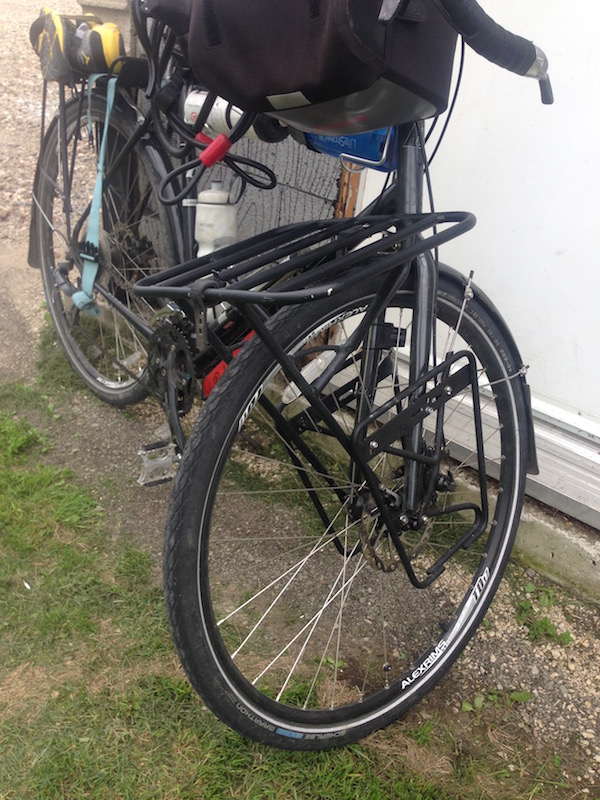
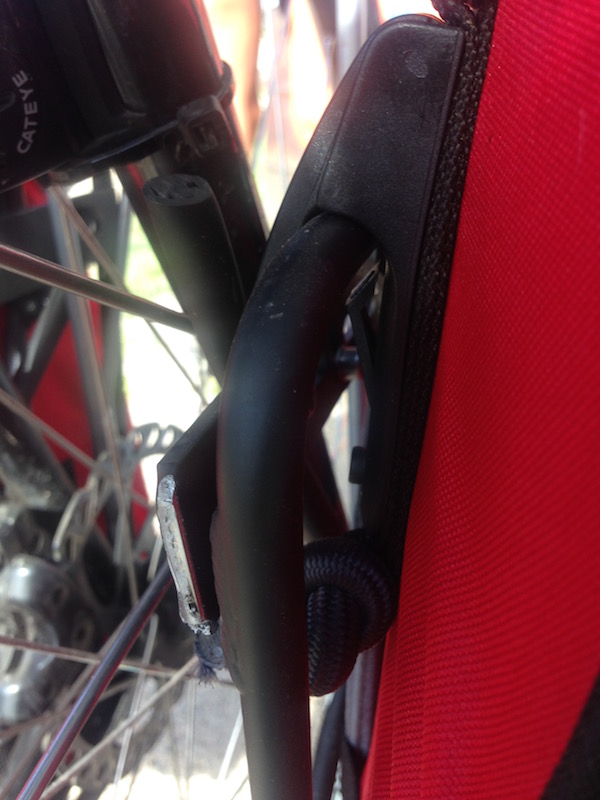
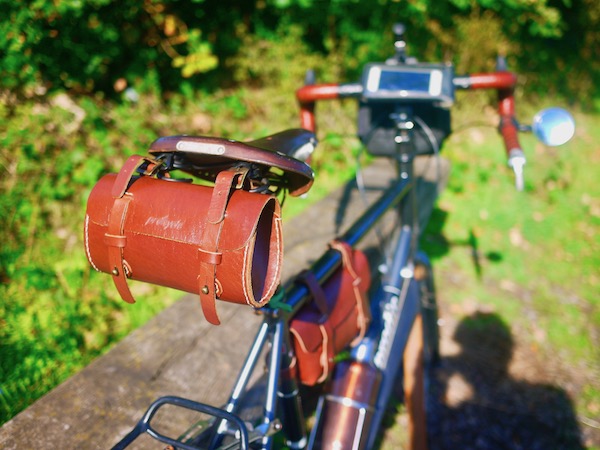
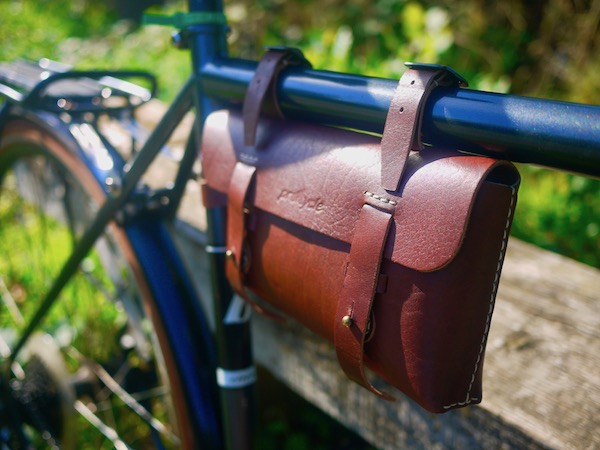
The size is also ample on both the bags and can easily accommodate a spare tube, multi tool and snacks. The Cross Bar bag is also designed with one straight end and one angled end that gives it an interesting quirky look. Two straps secure the bag to the top tube with a third on the side to attach around the downtube to stop it swinging side to side too much.

There’s definitely no danger of the bags opening on a ride as the straps are secured through a leather loop and a belt like button closure to keep all your goodies safe.

I was very happy to discover the Saddle Bag straps lined up perfectly with the loops on my brooks saddle so attached neatly and sat just right. I can see that possibly the bag could bounce around a little if loaded with heavy items, but as it’s only a small bag and will likely be holding light items like a tube and multitool it probably wouldn’t be an issue.

Galen Leather Bicycle Bags on my sexy Brodie BikeDURABILITY:

The most impressive part of the Galen Leather bags is definitely the quality and solid feel of them. The hand stitching is impeccable and looks like it would last a lifetime if cared for properly. The Galen Leather Bicycle bags are also treated with natural oils and beeswax to add an extra layer of protection against the elements.

Obviously only having rode with them for a couple of weeks I can’t really comment on how durable they are long term, but the leather is thick enough that I feel it would be very hard to damage these bags and they will most probably take quite a beating and come out fine.

Galen Leather Bicycle BagsThe straps are made from leather the same thickness as the bag and are wide enough that I doubt they will ever tear or the holes stretch too badly which could be a worry on a thinner strip of leather.

SUMMARY:

So Far I have been very happy with the Galen bags and love the touch of class they bring to my slightly beat up touring bike. They definitely turn a few heads commuting around town, but more than just being pretty they do their job perfectly, stashing extra stuff for when I’m out and about around town but don’t necessarily want to take a pannier along for the ride.

Galen Leather Bicycle Bags I can quite easily fit enough snacks for a solid days riding in the Galen Cross Bar bag while stuffing patches, inner tube, a multitool and my brooks seat cover in the Large saddle bag.

I’ve been happy enough with the bags and am confident enough in the quality of them that I’m planning on trying them out on Kelly’s mountain bike on our next bikepacking trip as the cross bar bag should just squeeze into her small bike frame and give her some quick easy access to essentials.

Beautifully crafted, eye catching and gets the job done!

Enjoyed this gear review? Check out a few other gear reviews.

Montem Sneaky Snuggler Puffy Camping Blanket: Gear Review

Montem Sneaky Snuggler Puffy Camping Blanket

SPECS:

Material: 20D Ripstop Nylon with DWR water resistant coating

Filling: 3D Hollow Fibre Synthetic Insulation

Temperature Rating: 40°+ Fahrenheit (4 degrees Celsius)

Colour: Slate with Red Trim

Size When Spread Out: 54” x 80” (137cm x 203cm)

Size in Carry Bag: 9” x 17” (23cm x 43cm)

Weight: 3.3lbs (1.4kg)

Compact: Yes

Tear Resistant: Yes

Water Resistant: Yes

PROS:

  • Super soft comfy feeling material, not shiny and slippery despite being water resistant
  • Very spacious even for me at 6 foot 1
  • Very wide when unfolded so perfect for two people to sit on for a picnic
  • Can pack down quite small in a compression bag
  • Very warm as a blanket and big enough that it can wrapped around you like a sleeping bag when temperature really drops
  • Much easier to get in and out of in a tent than a sleeping bag
  • Can be thrown over two people comfortably

CONS:

  • Not quite as warm as a sleeping bag
  • Can’t be zipped up
  • Maybe a bit too bulky for long term cycle touring

OVERVIEW:

We were asked if we’d Review the Montem Sneaky Snuggler Camping blanket before we did a car camping trip around Iceland and I decided to take it along on a bikepacking trip as well around the Cairngorms national park in Scotland to really put it to the test!

The idea of a blanket for camping really appeals to me as I enjoy the comfort and ease of just throwing a blanket over me instead of zipping myself in and feeling slightly trapped. The blanket performed excellently for the car camping in very cold conditions in Iceland and even held up well to the slightly rougher and more rigorous conditions of a bikepacking trip in warmer weather.

DESIGN AND FUNCTIONALITY:

The Montem Sneaky Snuggler Camping Blanket is designed very well and feels lovely against your skin providing a bit of home comfort while camping. The stuff sack it comes with is very generously sized so it is a breeze packing it away and pulling it out once you’ve set up camp or decide on a suitable picnic spot!

Montem Sneaky Snuggler Puffy Camping Blanket
Car Camping in Iceland! Sneaky Snuggler kept me toasty warm even when it got chilly in iceland!

Before our trip around Iceland I was slightly sceptical about the Montem Sneaky Snuggler Blanket’s ability to keep me warm if the temperature dropped close to zero, as I had never taken just a blanket camping before. It proved itself worthy on the first night of camping with temperatures dropping close to freezing, but I remained toasty warm simply by wrapping myself up in it tightly and tucking my feet in so my body heat couldn’t escape.

I loved the ease of just pulling it over the top of me when I was chilly without having to mess about with zips or zips jamming and particularly appreciated this when I needed to get up to go to the toilet in the night; much easier to get out of!

We also used it picnicking in parks across Iceland throwing it on the grass to sit on without worrying about getting too damp or dirty because of the water resistant coating, this is definitely a great feature and it makes it much more versatile than I first expected.

Montem Sneaky Snuggler Puffy Camping Blanket bikepacking
Montem Sneaky Snuggler blanket fit perfectly on my handlebars bikepacking the Cairngorms in Scotland.

Because of the generously sized stuff sack it is quite bulky when packed up, but for the bikepacking trip in Scotland I put the Montem Sneaky Snuggler Camping Blanket in a compression sack and was very pleased with how small it could be compressed down. It was easily small enough to be strapped to my handlebars without being to long and interfering with brakes, perfect!

It was extremely warm for Scotland when we were riding with temperatures reaching over 30 degrees Celsius, so I was very glad of having a blanket that I could easily vent myself with and kick my legs out when it was getting too warm without having to battle getting my feet out of like in a mummy style sleeping bag.

After 5 nights of bikepacking and wild camping I expected the blanket to be a bit dirty, but again the coating kept it stain free!

DURABILITY:

I found the Montem Sneaky Snuggler Camping Blanket to be very well made with quality stitching and the heavy-duty ripstop material feels like it will withstand any rough treatment you can throw at it, plus because it has no zips there’s not really much that can go wrong with it!

The DWR water repellent coating is definitely a very good feature for this blanket to make it more versatile so it can double up as a comfy picnic blanket without having to worry too much about it getting wet or any food spills staining it as easily as other materials.

SUMMARY:

Overall I have been very pleased with the Montem Sneaky snuggler camping blanket and it will now be my go to sleeping system for car camping and picnicking! For a round the world cycle trip I’m not sure it would be my first choice simply because blankets cannot compete with sleeping bags when it comes to warmth if the conditions get seriously cold as there is no way to trap the warm air in completely without zipping it around you so it wouldn’t be ideal for a trip where you could potentially run into some extreme weather. If it were a weekend away bike trip or a short journey locally then I definitely wouldn’t hesitate to bring this baby along for the ride!

It was lovely being able to snuggle up in the Montem Sneaky Snuggler at night as it really does feel like having a little slice of home with you in the tent. I also love that it is so multipurpose and can be folded out and sat on for a picnic or at a concert, thrown over yours and your partners shoulders or brought along on car camping trips as an extra layer either on the floor of the tent or over the top of two people if it is a particularly cold night.

I would definitely recommend the Montem Sneaky Snuggler if you’re not a fan of feeling trapped in a sleeping bag while camping or your looking for something a little more versatile! (Amazon)

You can find more of my gear reviews here!

THERM-A-REST EVOLITE SLEEPING PAD (regular size): Gear Review

THERM-A-REST EVOLITE SLEEPING PAD

SPECS: Therm-a-rest Evolite sleeping pad

Weight; 520gms

Dimensions; Length 183cm, Width 51cm, Thickness 5cm

Packed size; 23cm x 13cm

Price paid; $152

PROS:

• Very comfortable.
• Nice and warm.
• Small packed size for a full length mat.
• Very thick when inflated.

CONS:

• Expensive.
• Problem with outer material separating from inner causing a huge bubble to form making it unusable to use.
• Seemed to get dirty very easily.

Therm-a-rest Evolite sleeping pad
The Therm-A-Rest when it first began to develop a bubble

OVERVIEW:

On our last cycle trip from France to China we had purchased the cheapest (and sometimes only) gear available to us and ended up with tiny three quarter length inflatable mats that didn’t really offer any barrier against the cold coming up through the ground, particularly on our legs which hung over and rested directly on the tent floor.
We started of our trip across Canada with these same mats, but decided after the Rockies we needed some more warmth and comfort so picked up the Therm-a-rest Evolite sleeping pad in Calgary to give our tenty home some cushiony luxury and warmth!

DESIGN AND FUNCTIONALITY:

The Therm-a-rest Evolite sleeping pad ticked all the boxes for us. Packed up small enough to not take up much space in our panniers, insulated to keep our body heat being sucked out through the chilly Canadian earth and long enough too fully spread out and get some actual sleep on!

These pads taper away towards the feet but just enough to shave more weight off without sacrificing comfort. The cushiony ripples along the pad are nice and squishy provide plenty of comfort, 5 cm thickness means when sleeping on your side you don’t feel like your shoulders are sinking into the tent floor.

THERM-A-REST EVOLITE SLEEPING PAD
You can see where the two padded ridges have joined up to form a bubble

DURABILITY:

The Therm-a-rest Evolite sleeping pad seemed very well made and feel nice and rip resistant, I felt confident about putting them down directly on the ground if needed while setting up the tent without fear of a twig or rock popping them and the seams all look nicely sealed around the valve.

Everything was going great…until Prince Edward Island when I noticed the gap between two of the raised ridges in the pad had disappeared and the two ridges had joined together. I though ‘oh well, not a problem, as long as it doesn’t get any worse…” Unfortunately it did get worse, a lot worse. Once the outer layer had started peeling away and joining up the ridges, there was no stopping it from coming away further every time I inflated it.

It was developing a rapidly growing ‘bubble’ in the pad around where my shoulders rest making it very hard to sleep on. If I took my body weight off the pad you could actually hear the outer layer peeling away and eventually making a loud popping sounds the bubble grew larger and larger like some heavily pregnant orange alien. You can’t sleep on a pregnant alien, everyone knows this.

THERM-A-REST EVOLITE SLEEPING PAD
Giant blister! Not much fun in the old shoulder blades!

In the end the bubble expanded to the very top of the pad making it impossible to use and actually played a part in our decision to cut the trip shorter than originally intended, as I was exhausted from lack of sleep. After reading more reviews online I discovered I was not alone and this seemed to be a common occurrence and fatal design flaw in this otherwise solid piece of equipment.

SUMMARY:

So close yet so far. I loved the comfort, packed size and weight of the Therm-a-rest Evolite sleeping pad, but I didn’t like the gigantic spine melting bubble that formed. If it hadn’t have had this issue I would have gladly called this my bed for the rest of our round the world adventures, but alas, it was screwed. We ended up returning both our pads (Kelly’s was fine but feared the same thing would happen eventually) to MEC where we purchased them from and settled on the more tried and tested Therm-a-Rest ProLite Plus Mattress instead as no reviews mentioned anything similar happening.

The Therm-a-rest Evolite sleeping pad gets 2.5 out of 5 for the major faults and discomfort it caused me. (Amazon/ Our Gear List)

Enjoyed this gear review? Check out a few other gear reviews.

MSR HUBBA HUBBA NX 2 PERSON TENT: Gear Review

MSR HUBBA HUBBA NX 2 PERSON TENT gear review

SPECS: MSR Hubba Hubba NX 2 Person Tent

Weight: 1.72kg (3lbs 13 oz.)

Dimensions: 1.27m x 2.13m total internal floor area of 2.7sqm

Price paid: $437 from MEC

Packed dimensions: 46cm x 15cm

PROS:

• Very spacious inside for two people with gear.
• Superlight weight and packs down very small.
• Sets up extremely quickly with option of inner first pitching which is handy if it’s raining!
• Freestanding so doesn’t need to be staked out if set up on concrete.
• Well ventilated, no condensation issues.
• Sturdy in high winds.
• Quick and easy to take down and pack into wide opening compression bag (included).

CONS:

• Expensive.
• Material is highly waterproof but feels thin and slightly fragile like it could tear easily.
• Two of our stakes snapped.
• Floor inside the tent was always slightly damp in the morning despite using the footprint.
• Cross pole on the top of the tent started to bend out of shape.


MSR Hubba Hubba NX 2 Person Tent
Plenty of space for two peoples panniers in the vestibules. Prince Edward Island.

OVERVIEW:

We purchased this tent in 2015 before doing the multi day ‘West coast trail’ hike on Vancouver island with the intention of also using it for our round the world cycle trip. The major appeal of the MSR Hubba Hubba NX 2 Person Tent for me was it’s tiny packed size, weight and excellent livable space inside so we wouldn’t feel cramped up after months at a time living in it while riding.

I love this tent, the design, the space inside and out and I wanted this to be our home for a long time, unfortunately it just didn’t seem to last and after 4 months cycling from Vancouver to Halifax we decided it wasn’t up for a round the world trip so we ended up returning it to the store we purchased it from.

MSR Hubba Hubba NX 2 Person Tent
Lake Superior, having a freestanding tent helps when you can’t stake it out in beach sand!

DESIGN AND FUNCTIONALITY:

The design and layout of the MSR Hubba Hubba NX 2 Person Tent is extremely well thought out and works beautifully. You have a huge amount of floor space for such a lightweight tent, but the big bonus of this baby is the incredible amount of headroom and a feeling of space all around you due to the ingenious vertical sidewalls that the pole set up creates.

Many lightweight tents feel cramped and claustrophobic inside, but MSR managed to make the MSR Hubba Hubba NX 2 Person Tent feel like a mansion! We tried out several tents before purchasing this and have tried out many since to replace it, none of which felt as roomy. Several of the tents I tried were actually larger on paper, but when I got inside my feet touched one end and my head touched the other due to a classic ‘dome’ style slanting design as opposed to the Hubba Hubba’s vertical walls. I’m 6”1 and can comfortably lay down in the Hubba Hubba with a little bit of space at my feet for a small bag and we have a nice amount of room either side of us to not to feel like we’re fighting with each other for room.

Kayaking in Deep Cove B.C

The single pole deign is very clever with a central hub connecting a cross pole in the centre to give you plenty of head room and extra stability with another hub each end for the vertical side wall pole pieces to pop into. The poles are made of DAC featherlite aluminum and easily connect with each other and are super easy for one person to connect together by themselves. After you’ve put it up a few times you’ll have this bad boy fully set up in 5-10 minutes…less if it’s raining and you’re cold!

There’s plenty of mesh on the inner tent so it feels nice and airy but still enough material to keep in warmth on chilly nights. Each end of the tent has added ‘kickstand’ opening for added ventilation and to achieve a cross breeze in warmer weather.

The large D shaped doors on either side are easy to get in and out of and have plenty of clearance from the ground so water shouldn’t splash in if you’re making a dash back in to the tent in the rain. Also has built in rain gutters that channel water away from the zips so you don’t end up getting drenched when you unzip the fly.

The two vestibules either side of the tent offers enough room for all of our panniers and would be plenty of space if you were using it for hiking packs. There isn’t a porch or enough room to safely cook in the vestibules, but definitely ample space for your gear.

There are two mesh pockets at either end of the tent to store bits and pieces, would have perhaps been better having the pockets on the sides instead of the ends so you don’t lose any length when the pockets are full.

DURABILITY:

The fly of the tent is made of 20 denier ripstop nylon rated to 1200mm waterproofness while the floor is made of 30 denier ripstop rated to 3000mm. we never had any issues with rain getting into the tent through the roof, but the floor always felt damp no matter how or where we set it up even using the MSR footprint purchased separately.

In order to achieve the impressively light weight, obviously lighter materials have to be used. For me the floor just feels a little bit too thin to inspire confidence and we were always slightly worried about accidentally ripping it. No rips or tears ever did occur in the tent, but no matter how it was set up I always woke up with a wet sleeping bag from the floor.

The plastic hooks used to attach the inner tent to the poles feel very sturdy and I doubt they would ever break unless you stood on them pretty hard and crushed them.

The DAC poles are crazy light, but feel very solid and kept the tent rigid and upright even in strong winds, unfortunately the crossbeam pole in the centre of our tent had begun to bend out of shape pretty badly causing a slight sag in the top of the tent. I don’t know if it would have ever actually snapped, but after 4 months on the road with another 4-5 years ahead of us, we didn’t want to take that risk.

The ‘mini groundhog’ stakes that come included with the MSR Hubba Hubba NX 2 Person Tent  are super lightweight and work very well, but unfortunately the heads snapped off three of ours within the space of a few weeks so they definitely lose points there!

The included compression bag is a killer design making packing it away super quick and easy with two compression straps and a string and toggle to squeeze it all together nice and compact. Our bag had developed several small holes on the ends that concerned me; the bag appears to be made of the same material as the tent and if it developed holes that quickly then it might not be a good sign for the tent itself. I could be being a little unfair here as these holes did develop when doing the west coast trail which was pretty wild and rugged hiking where the bag probably took a bit of a beating on the outside of my pack.

mSR Hubba Hubba NX 2 Person Tent
Camping in Jasper letting the fly dry out before fully setting the tent up.

SUMMARY:

I loved the SR Hubba Hubba NX 2 Person Tent . I wanted this tent to be with us forever, but in the end I think it was more suited to hiking and camping rather than a near permanent home that we were trying to make it cycle touring.

Design wise, there is very little I would change about this tent, for two people it hits that sweet spot between having enough space inside and not taking up a crazy amount of room to set up. When wild camping this can be a fairly important factor for choosing a tent as we tend to find ourselves setting up in a random tiny sliver of grass behind a bush on a backroad somewhere so a massive tent that requires a lot of space can be a drawback.

It’s packed size is truly impressive and fit perfectly on my front rack without the need to split the tent up or share the load by one of us taking the poles etc.

In the end the frustration at the leaky floor and our uneasiness with the bent pole made us decide to return the tent while still could taking advantage of Canadian outdoor store MEC’s excellent return policy.

To replace this tent was a tough decision as every other tent we tried after this paled in comparison. In the end we opted for another MSR tent, the Elixir 2 as it is extremely similar in design to the MSR Hubba Hubba NX 2 Person Tent, only made of heavier thicker materials. The weight difference is fairly significant (over a kilogram) and it doesn’t pack down as small, but we are hoping that the thicker materials make it longer lasting so we can enjoy our home for years to come on the road! When we’ve actually started using the tent I will post a review of the Elixir 2.

I give the MSR Hubba Hubba NX 2 Person Tent a 3 out of 5.

In many ways the MSR Hubba Hubba NX 2 Person Tent is my dream tent and it would have scored higher if not for the durability issues we had. Amazing tent for weekend cycle trips and hikes, but perhaps just not up to the rigors of long term cycle touring. (Amazon/ Our Gear List)

Enjoyed this gear review? Check out a few others, the Origin8 Classique Cargo HD Front RackEVO Low Rider Fork Mounted Front Rack and the BRODIE CIRCUIT 2015 Touring Bike.

BRODIE CIRCUIT 2015 Touring Bike: Gear Review

BRODIE CIRCUIT 2015

SPECS: BRODIE CIRCUIT 2015

Weight; 12.97 kg (28.6 pounds)

Material; 4130-butted Chromoly steel

Brakes; Hayes MX5 mechanical disc brakes

Rims; Alex TD-17

Front Derailleur; Shimano Altus

Rear Derailleur; Shimano Claris

Cranks; Shimano Acera 28/38/48T

Cassette; Shimano Acera 11-30T

Shifters; Shimano bar end 8 speed

Hubs; Shimano M475 / Formula

Size; XL (60cm)

Price paid; $850 Canadian dollars, no tax paid! RRP was $1120+tax so I scored a bargain as it was the previous years model and I bought it from outside Canada I didn’t have to pay tax. Woohoo!

Michael's new touring bike, new touring bikes

Note: I am pretty clueless about technical bike stuff so I have no idea what any of the specs mean, so this review will just be pretty basic about what I like and don’t like about my new baby!

PROS:

  • Outstanding price for a Chromo touring bike with disc brakes.
  • Nice upright position, good stem angle.
  • Wide drop bars giving plenty of hand positions.
  • Brakes feel solid and dependable when fully loaded.
  • Looks like a sexy old school classic tourer.
  • Bar end shifters kick ass!
  • Rims take up to 38c tires.
  • Mid blade fork braze ons for front rack / fenders.
  • Three bottle cage spots.
  • 24 speed.

CONS:

  • Slightly wobbly fully loaded (but this was EXTREMELY fully loaded at the start of trip before I got rid of excess crap).
  • Although it can take 38c tires it gets pretty tight with fenders.
  • Paint seems to scratch very easily, cables on head tube rubbed the paint on the logo completely off.
  • Snapped two gear cables and the chain in 4 months, never had any problems like that on our previous trip with cheap hybrid bikes in worse conditions.
BRODIE CIRCUIT 2015
Lots of space for water bottles on a 60cm frame! Lake Superior.

OVERVIEW:

Our previous cycle tour from France to China had been done on a pair of second hand ex rental Trek hybrids that were too small for me and too large for Kelly. So this time I was determined to get bikes that were more up for the task of riding around the world! I had my heart set on a steel framed tourer this time as we would be travelling in so many different conditions that I figured the sturdiness and durability of steel made sense.

I researched the options for buying touring bikes at home in Perth, Western Australia, but our options were fairly limited, more expensive and when you add in the cost and hassle of transporting them to Canada by plane it made more sense to buy bikes in Vancouver at the start of our trip.

I researched as many bike shops as possible in Vancouver contacting a whole bunch and ended up being offered the bargain price on the Brodie Circuit 2015 with the added bonus of not having to pay tax as the purchase was made outside Canada. Kelly’s original bike was a Norco Search from the same shop, but this didn’t work out as I think has been covered in previous posts and she ended up getting the 2016 flat bar model of the Brodie Circuit that I’ll cover in a separate post.

DESIGN AND FUNCTIONALITY:

The Brodie Circuit 2015 was exactly the bike I’d been hoping for with my limited funds! I spent hours staring at the pictures on the Brodie website and from the bike shop, but it is still a bit nerve racking purchasing a bike that you intend to ride around the globe without ever actually trying it out first!

I was thrilled to finally see it up close in the shop and over the moon to find that it was actually a good fit for me! I was in love.

The angle of the stem puts you in a nice upright position for long days in the saddle and the nice wide drop bars means you have a fair amount of space for a handlebar bag without losing hand positions.

The curve and length of the drops are excellent making it nice and comfortable cruising along in the drops without feeling like you’re hunched over too much.

Finally having a bike large enough for me felt great, everything just felt right. The bonus of having a 60cm frame is plenty of room for water bottles! One design flaw for me was the placement of the main bottle cage on the seat stay, using a standard top release aluminum cage; the cage actually interfered with the shifting of the front derailleur. I remedied this easily by bending the cage slightly, but the cage mounts could have perhaps been placed slightly higher on the frame to avoid this interference.

Front and rear facing eyelets on both the fork and rear give multiple rack set up options along with mid blade braze ons on the fork giving added mounting versatility.

It rides beautifully. I hadn’t owned a steel framed bike before and could definitely notice the difference in handling particularly on bumpy roads, the steel seemed to keep me a bit more stable and jarred less when hitting rough patches.

I never felt like I’d run out of gears on this bike, even in the Rockies I felt 24 was enough to get me up the steep passes, I also like that an 8 speed chain and cassette is relatively easy to get a hold of when in random spots around the world.

Can’t comment too much on the stock saddle and tires (Brodie saddle and Kenda Kwest 35) as I swapped them out straight away for my brooks B67 and our Schwalbe marathons, but the saddle did seem decent to be fair.

BRODIE CIRCUIT 2015 gear review
Racked up and waiting for the next adventure!!

It looks sextacular. I will not lie. I have a total man crush on my bike. The dark grey paint job with white Brodie logo looks great and gives it an old school charm. While it looks like a classic road tourer, it actually handles light off road and rocky tracks like a beast too!

DURABILITY:

The Brodie circuit 2015 feels like a serious touring bike when you hop on. The weight of the bike and the beautiful neat welds inspired confidence in my shiny new machine from the first meeting!

The Alex rims took a fair amount of punishment on some of the rougher cycle trails we chose to take and came out unscathed. At the start of the trip I had a ridiculous amount of weight on the rear rack and had feared that I’d end up busting a rim, but they held up beautifully. I’ve since scaled back the crazy amount of crap I was carrying to a slightly more sensible load.

Light rust developed in some of the braze ons, but that’s kind of to be expected being left out in rain and frost across Canada so I’m pretty sure any bike would develop a minor amount.

The paint job while looking fantastic, it does seem to be fairly fragile and it didn’t take long for scratches to appear. The major paint problems were from the gear and brake cables rubbing on the head tube of the bike giving the Brodie ‘B’ logo a nasty scar straight through it. Also had paint rub off under the straps of my top tube bag, I’ve since used tremclad rust proof paint over the patches, but I was hoping the paint job would be a little tougher.

I also managed to wipe out pretty badly in the Rockies while trying to take a photo while pedaling (yeah I’m not the brightest) but the bike took this pretty solid hit and came out fine!

BRODIE CIRCUIT 2015 gear review
My bike has been converted in to more of a beer transporting machine since living in Halifax!

I was surprised to snap a chain so quickly on this bike and go through two gear cables, but I am putting that down to the insane load I was trying to carry so can’t really blame that on the Brodie Circuit 2015.

SUMMARY:

Overall after 7000+kms I am super happy with the Brodie Circuit 2015 touring bike! It handles beautifully, feels solid like it will last me for the next 4-5 years of this trip and beyond and is also versatile enough that it can be used on road and also on trails making our route choices more open. I feel incredibly lucky to have picked up a brand new 4130 Chromo touring bike with all the bells and whistles for $850 and even if I did pay full price it would have still been a solid choice.

It was also kind of nice riding across Canada on a Canadian bike!

I give the Brodie Circuit 2015 model a 4 out of 5 stars. Excellent value and a solid touring machine! (Gear List)

Enjoyed this gear review? Check out a few others, the Origin8 Classique Cargo HD Front RackEVO Low Rider Fork Mounted Front Rack and the MSR HUBBA HUBBA NX 2 PERSON TENT.

Origin8 Classique Cargo HD Front Rack: Gear Review

Origin8 Classique Cargo HD Front Rack Gear Review

SPECS for the Origin8 Classique Cargo HD Front Rack:

Weight: 950gms

Dimensions: 38cm x 35.5cm x 35.5cm

Price paid: $55 USD + postage on Amazon

PROS:

  • 25 kg capacity!
  • Well-made and sturdy ‘one piece’ construction
  • Plenty of attachment points for cargo
  • Looks cool with a kick ass matte black paint job
  • Adjustable height
  • Can fit pretty much anything you would ever need on tour on the platform

CONS:

  • Very wide and awkward for touring / locking in public bike racks
  •  Mounts in the thru axle, which can mean buying a longer quick release skewer on some bikes
  • Fairly heavy
  • Cannot carry panniers
  • Does not come with longer quick release skewer or even instructions on how to mount the rack
origin8 classique cargo front rack bike
The beast!

OVERVIEW:

I purchased the Origin8 Classique Cargo HD Front Rack while still at home in Perth, Western Australia to aid me in my never ending beer runs from work (at a liquor store) where I was constantly lugging 30 plus cans and bottles of sweet delicious life giving beer home for essential taste testing. I was so impressed by the way I could pile huge amounts of weight onto this bad boy without it even flinching that I decided to pack this big bulky awkwardly shaped bugger into my backpack to come for an adventure with me across Canada and beyond. And just like that the Origin8 Classique Cargo HD Front Rack became apart of our gear for our trip across Canada.

DESIGN AND FUNCTIONALITY:

The Origin8 Classique Cargo HD Front Rack is a very well thought out and designed piece of equipment that also adds a classy stylish professional cargo bike look to any bike you use it with.

Designed to attach in three points to your bike; above the fork in the same hole you would attach fenders to and at the bottom of the rack using your bikes quick release axle skewer. I attempted to attach the rack using the skewer my bike came with but it was not long enough to lock down with the rack attached so I had to get creative and use the lower fork eyelets to attach the rack.

This was not a major issue, but the lack of mounting instructions and hardware provided was a bit frustrating and I was lucky that I happened to have some spare screws and washers that allowed me to mount it in this fashion.

The lower attachment holes are designed for the quick release skewer to fit through with the skewer end cap holding it in place, so as such the holes are quite large openings and cannot be used with the smaller M5 type bolts that fit in standard bicycle attachment points without use of an oversized washer to stop the screw from simply slipping through the opening and not holding the rack in place.

To get around this I simply had to use a large washer to prevent the screw from slipping through the racks attachments holes, again not a major issue and I still feel it was perfectly secure in this manner, but not quite as neat looking…to be honest I’m not a fan of racks that use the skewer as an attachment point anyway as I think it can put added stress on a fairly important part of your bike!

Apart from my axle mounting issues, the rack was fairly straightforward to attach to my bike. The legs of the rack are extendable and can be used on bikes with 26-29 inch wheels and lock in place with use of bolts and holes screwed at various intervals along the extendable portions of the legs. The extending portion of the legs can take a bit of convincing to pull out, but were easy enough to twist and pull down with my bare hands without the use of pliers.

The top attachment point is also adjustable so you can fine-tune the angle and distance the top platform sits in relation to the bike.

I love the layout of the Origin8 Classique Cargo HD Front Rack! It has four thick, round bars on the massive top platform plus the outer frame making it incredibly easy to attach anything you want to this rack without much hassle at all. The multiple struts connecting the top platform to the legs give you endless possibilities of places to loop your straps or bungee cords around and keep your load safe and stable as you cruise around town.

When loaded up heavily it does drastically change the feel and steering of the bike…but that is always going to be an issue when riding with a loaded bike. This is especially the case when the weight is high up like on a cargo rack, but you do get used to it and just have to take the load and weight into account when cornering and steering. Ultimately having the load up high and the way it effected the cornering caused me to reconsider riding around the world with this rack, but as a grocery runner and general around town hauler this rack is a total boss.

origin8-classique-cargo-front-rack-side
Side angle of the rack

DURABILITY:

The all in one construction means it is super strong and feels rigid and sturdy when attached as opposed to some racks that fold down and require assembling. The thick and strong round aluminium struts make you feel totally confident about the durability of this rack and it’s ability to carry pretty much anything you feel like strapping to it…as long as it’s under the HUGE max weight limit of 25kg.

I’m actually pretty sure I’ve exceeded that weight limit hauling beer around town before and had no problems, but probably wouldn’t recommend it.

The tubes on this rack are super thick and all the welds are very professionally done and neat with multiple struts reinforcing and holding the top platform in place.

I can attest to the strength of this as unfortunately, I have crashed my bike with it on several times. I’m a bit of clumsy fool and took a few tumbles at home on bike paths after sampling a few too many of my works goods, plus a fairly major fall in the rocky mountains near the start of the trip. The rack did hit the pavement in the crashes and came out fully intact, some very minor scratches to the paint but otherwise unscathed. Considering the impact that the rack took I was very surprised how well the rack survived and particularly how well the paint job stood up.

Bomb proof rack!

warmshowers saviour
Work getting done on the bike! You can see the rack in the front.

SUMMARY:

I love the Origin8 Classique Cargo HD Front Rack. I do not want to get rid of this rack, but I kind of feel that I have to.

If I was running errands around town, picking up groceries and doing beer runs, I would never need any other rack than this, but for long distance touring it’s just not working out for me.

When fully loaded with rear panniers and a backpack on the top of the rear rack the addition of any substantial weight high up on the top platform of this rack makes the ride wobbly and unstable, so on the next leg of our trip I will be opting for either low rider front racks or fork mounted bikepacking style cargo cages such as Blackburn Outpost Cargo Bottle Cage or Salsa Anything cages. As for the beer – I’m going to be carrying growlers in future (no joke)!

The wobbly unstable ride is not the fault of the Origin8 Classique Cargo HD Front Rack, the fault lies with the amount of crap I’ve been carrying on tour. It’s not meant to be a rack for touring; it’s a cargo rack…for carrying cargo around town.

If you are considering getting the Origin8 Classique Cargo HD Front Rack to tour with I would have a good long think about exactly how much stuff you intend to carry high up on the front of your ride, because chances are you don’t need a rack this big and capable carrying such weight. Also consider the width and chunkiness of this rack for touring; if you need to squeeze it into a bus or car to hitch a ride, it can get awkward. I’ve also found it difficult locking Kelly’s bikes and mine together sometimes as the rack gets in the way and pushes the bikes apart.

However, if you’re looking for a rack to haul all sorts of crap around town and help your best friend move a fridge, then this baby is for you! Well made, looks sexy and super easy to strap stuff too.

I give the Origin8 Classique Cargo HD Front Rack 4 out of 5 stars. (Amazon/ Our Gear List)

Read my gear review about cycling with the LifeStraw Go water bottle filter or with the Goal Zero Rock Out 2 Speakers.

LifeStraw Go water bottle filter: Gear Review

lifestraw bottle and lid,LifeStraw Go water bottle filter

SPECS for the LifeStraw Go water bottle filter:

Weight: 221gms

Dimensions: 22.85cm x 7.6cm x 7.6cm

Volume: 650ml

Filter capacity: 1000ltrs

PROS:

  • Easy and quick filtration method
  • No batteries or chemicals needed
  • Fits in standard water bottle cages
  • Easy to clean
  • Can be operated one handed on the bike (flip top mouth piece)
  • Comes with caribiner and attachment point for connecting to backpack
  • Replaceable filter

CONS:

  • Leaks when not upright
  • Small volume
  • Don’t get big gulps of water due to water passing through the straw fibers

OVERVIEW

On our previous cycle trip we relied on a Steripen U.V filter and iodine tablets to purify drinking water that we suspected was not clean and while both these methods worked fine, the Steripen is very time consuming and requires batteries and the iodine leaves a pretty funky taste in your mouth and doesn’t filter out any chunky bits so we were very excited when we came across the LifeStraw Go water bottle filter!

lifestraw bottle and straw
What the straw looks like out of the bottle

FUNCTIONALITY:

This a brilliant piece of equipment and integrates Lifestraw’s revolutionary Personal water filter into a water bottle for conveniently transporting filtered water instead of just being able to suck it up directly from a lake / stream river / puddle or whatever you can now fill up and filter on the move!

It uses hollow fiber membrane strands packed tightly inside the large straw to prevent pathogens and bacteria from passing through so you only get a mouthful of good clean H20 instead of all the other potentially nasty stuff that could be lurking in the water. It’s super easy to clean out only requiring you to blow out the excess water from the straw to expel any dirt or nasty stuff that his been trapped in the filter and you’re good to go again!

The manufacturer claims that the straw can filter up to 1000ltrs before being replaced which is pretty impressive and I’m guessing it might even be more than that depending on how dirty the water is that you use with this. We’ve used it collecting water from rivers and lakes across Canada that appear fairly clean so I think we’ll get at least a thousand liters out of it if not more as opposed to if it were being used in muddy rivers or ponds.

The most appealing part of using this water bottle for me is the fact that you don’t have to sit down and pre filter your full days worth of drinking water; you can simply fill all of your water containers with dirty water and just refill the LifeStraw Go water bottle filter with the dirty water throughout the day and filter it as you drink! Saves a lot of time and messing around and you don’t have to ration your drinking water if you haven’t filtered enough at the start of the day.

lifestraw bottle
Another photo of the lifestraw bottle

DESIGN AND DURABILITY:

The bottle itself is pretty sturdy and made from solid plastic, so not quite as convenient for cycling as a squeezy bottle, but that’s not what it was designed as so I guess you can’t hold that against it! A few weeks ago going over some pretty rocky cycle paths in New Brunswick the LifeStraw Go water bottle filter popped out of cage at fairly high speed and hit a rock on the side of the road. The bottle itself didn’t crack, but a small piece of plastic from the near the mouth piece broke away, I think it is made very solidly though and any other bottle would have probably sustained similar damage from the impact.

The bottle has a rubber seal around the top that doubles up as an attachment point for the included caribiner clip which is a very nice touch and would definitely come in handy for lashing to a pack when hiking or even clipping on to a pannier if you don’t have enough bottle cages on you bikes.

The mouth piece is a flip top with convenient thumb grip to get it open allowing you to use it one handed when on the go hiking or riding and has a soft silicone covering over the valve.

The straw itself is completely protected inside the water bottle, but if it were dropped when refilling the bottle I think it would survive pretty well as it’s constructed of hard plastic and feels solid so would take a fair bit of impact to cause it any damage.

There are only two major drawbacks with this bottle that I can see, the first is the volume of water it can carry, 650ml is not a whole lot really, but is still enough to keep you going for a short period. If LifeStraw came out with a larger volume version with a longer straw, like maybe 850ml that would be ideal for touring and hiking.

The second and most annoying drawback for this bottle is that it is not leak proof despite being advertised as such. The leak doesn’t occur from where the lid attaches to the bottle, rather from where the mouthpiece pivots to join the lid. It’s not a heavy leak where if you turned it upside down the water would flow out of the bottle rapidly, rather a slow leak where the water drips out gradually, but it is still enough of a problem that I don’t trust it in the tent at night or lying on it’s side for long periods. This problem occurs with both mine and Kelly’s bottle so I don’t believe it is simply a faulty bottle, I think it’s more of a design flaw…still not a major issue just a minor irritation.

lifestraw bottle and lid
What the lid looks like! You can also see the crack in the bottle lid from where I crashed on the bike.

SUMMARY:

I give the LifeStraw Go water bottle filter 4 out 5 due to leak issue, other wise this baby is a total life saver and an essential bit of kit for a world cycle tour!

This was one of those purchases where at the time we didn’t really think we needed it as we already had a filter, but since using it for the last 4 months cycling I cannot imagine living without it! It’s extremely convenient and totally reliable, as you won’t get caught out by batteries dying on you when you’re parched. Having the ability to filter ‘on the go’ is awesome and gives you a sense of security when cycle touring knowing that you can filter water in an instant and the fact that it happens to fit in my bottle cages is an added bonus!

I would definitely recommend the LifeStraw Go water bottle filter for cycle touring. (Amazon / Our Gear List)

Want more? Read my gear review on the Origin8 Classique Cargo HD Front RackEVO Low Rider Fork Mounted Front Rack and Goal Zero Rock Out 2 Speakers.

EVO Low Rider Fork Mounted Front Rack: Gear Review

EVO Low Rider fork mounted front rack

SPECS for the EVO Low Rider fork mounted front rack:

Weight: 635gms

Dimensions: 24.9 cm x 31.75 cm

Price Paid: $39.99 (CAD)

PROS:

  • Easily attaches to mid blade eyelets and lower fork eyelets
  • Doesn’t interfere with mechanical disc brakes
  • Cheap!
  • Low profile, Can’t be seen when panniers attached

CONS:

  • Unstable, causes “wobble issues”
  • Cheap poor quality materials and substandard welds
  • Will break…multiple times
  • Aluminium is not easy to weld if (when in this case) breaks
  • No stability loop bar over the front wheel

OVERVIEW:

I had made it all the way to Regina from Vancouver with far too much crap piled up high on the bikes’ front cargo rack which caused my front end to sway out of control if I wasn’t giving the handlebars the ‘grip of death’ constantly to keep it stable and I had finally had enough. I needed to re distribute the weight, a low rider rack and front panniers seemed like the best option.

In Regina I had the choice between an axiom lowrider and an EVO Low Rider fork mounted front rack and seeing as I had been told bad things about Axiom racks from a Warmshowers host I opted for the EVO Low Rider fork mounted front rack…oh what a horrible choice!

evo front rack
The EVO front rack on the bike without the panniers.

DESIGN AND FUNCTIONALITY:

The EVO Low Rider fork mounted front rack is a simple design attaching to the bikes mid blade eyelets and lower fork eyelets and has some slight room for adjusting to fit your bike with three possible different attachment points for the mid blade eyelets so you can have it angled to suit your needs.

Right out of the package it was very simple to fit to the bike and I was able to position it easily so it did not interfere with my disc brakes, it does however limit the use of the wheels quick release lever so I needed to position the lever in a way that I could still gain access to it once the rack was attached meaning I needed to tighten the nut on the opposite side of the wheel to the quick release lever more as the lever could no longer move freely. Not a major issue as it is not advertised as disc brake specific rack, but something to bare in mind.

I purchased a pair of Axiom Typhoon 18ltr panniers at the same time as they were the only bags available to me and they fit the rack perfectly, it has plenty of space on the bottom bar for the bags to hook on to and the top bar is nice and wide allowing the clips to drop into place easily.

That’s about where the positive features of this rack come to an end.

When riding with the panniers loaded you can actually see the rack slightly flex back and forth due to the lack of a stability loop over the front wheel to connect the two sides of the rack…I knew these guys weren’t going to last pretty early on.

It had been my hope that getting the weight lower on the bike would stabilize my ride and get rid of the wobbles I’d been experiencing, but unfortunately due to the flexing issue they only added to the problem.

It didn’t matter what I had in the front panniers; I tried it with heavier gear like our food up front and lighter stuff like sleeping bag and clothes, but it didn’t matter what the racks were supporting, they still flexed and wobbled horribly.

evo rack front
Close up of the front rack, with the panniers attached

DURABILITY:

These things are a joke. It took less than a week for the first break to occur snapping at the top weld connecting the flat inner bar to the outer frame. Luckily for me we were staying with a Couchsurfing host in Manitoba who just so happened to have a blacksmith neighbor with an aluminium welder who managed to reconnect the broken section, but I was warned by the welder that he felt it was a cheap alloy and would most likely break again. He was correct.

Over the coming month these pieces of shit snapped in several different places and I had to hold them together with hose clamps until finally the outer was no longer salvageable and I limped into Ottawa with these useless hunks of crap flapping wildly on my front forks.

Contacting EVO was pretty much pointless. The customer service was terrible and I was told ‘sorry for your misfortune’ which pissed me off even further. It was not my misfortune, it was their terrible product that was the problem.

evo rack bike
Another photo of the bike with the racks attached

SUMMARY:

I give the EVO Low Rider fork mounted front rack 1.5 out of 5. Some nice design features, but made with terrible weak material and shoddy welding. Steer clear of EVO racks!! (Amazon / Our Gear List).

Like this review and want to read more? Check out my review on the Origin8 Classique Cargo HD Front RackLifeStraw Go water bottle filter and Goal Zero Rock Out 2 Speakers.